Seven tips for plumbing a basement
Today I took one of the first steps in a very long journey of finishing the basement. The task at hand was plumbing. This involved breaking into the existing lines in the house and plumbing new lines to both what would be someday be the basement bathroom and also a wash sink for the basement.
First came breaking into the existing plumbing. For this I needed to master an old skill: soldering copper pipe. Prompted by what was apparently an effective mass marketing email from the Home Depot, I had pre-ordered all of the supplies I need to tackle this project. Or so I thought.
Tip #1: Buy both a regular sized pipe cutter and also one that is meant for confined spaces. You will need it even if you are certain that you will not. I decided to start with the hot water as it could be shut off independently of the whole home water supply, just in case a baby emergency came about. The full size pipe cutter I bought turned only about 350 degrees around the pipe. This left me with a pipe that was only partially cut. A quick trip to the store and I was ready to finish cutting the pipe.
Tip #2: Never leave the water supply on when a pipe is cut, even if there is “no way” water could flow through it. While I was out at the store, my loving wife decided to be helpful around the house and do some laundry. Knowing the hot water was off, she decided to run a “cold” cycle. What was not known is that even the cold cycle uses a little hot water. With the hot water supply off and no pressure in the pipes, when the washing machine called for a mix of hot and cold water the cold water flowed into the cold valve and out the open hot valve back into the house plumbing. Following the path of least resistance, this water flowed right out of the cut water pipe in the basement. Good thing there is a floor drain down there…
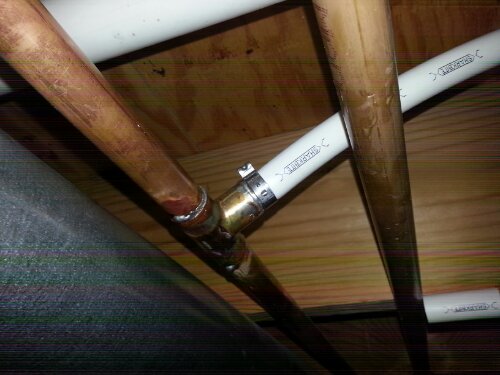
For my first attempt at soldering, I decided to go for something easy in case the results were less than satisfactory. I set up a work bench out side and placed a copper T connection in it with a copper to pex pipe adapter in one end. After successfully soldering these two pieces together I had the confidence to move on to the actual basement plumbing. At the site of the previously removed section of pipe, I let the water drain, cleaned off the ends of the pipe and the fitting, applied some flux, and I was ready to go. Perched on a ladder, I found an angle for the flame to heat pipe while not burning the nearby floor joists and let the solder flow.

The joints of the T to the home piping were just as good if not better than the trial run in the driveway. Having mastered the ancient art of soldering copper pipe, I felt inspired to plumb everything in copper. That was, until my first run of pex.
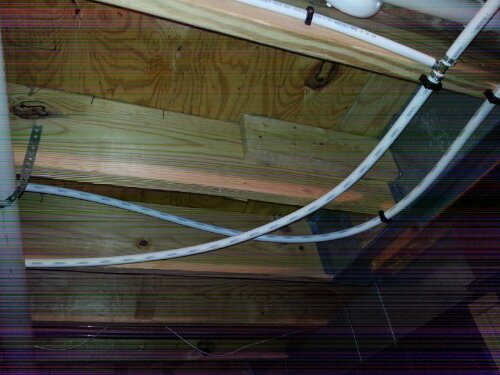
Tip #3: Use pex! With the correct tools, pex is stupid simple to run. Everything just clamps together. The piping is flexible and easy to manipulate. Kinking is not nearly the problem it is with copper. And it was around 1/3 the cost of copper. The purist in me debated plumbing everything in copper. The realist in me was very glad I decided to make the jump to pex.

Tip #4: Spend a little extra on decent tools. You don’t need to spend a ton on name brands or “professional” tools, but make sure you get quality pieces. The hose cutter I got was from Harbour Freight and it works great. The first pex crimper I bought was from Home Depot. It was a two-handed crimper. This was a huge mistake. When putting the pex piping together, one hand is needed to hold the connection and position the clamp. A two-handed pair of crimpers makes each joint a pain. But the worst part of the crimpers sold by Home Depot is the design of the tool. Three crimps into the project and the tool shattered in my face. Luckily the flying pieces the tool completely missed me and the only damage done was a ringing ear due to the loud pop. This piece that failed was the jaw of the tool that was used to crimp the clamp. Looking at the failure, the Chinese manufacturer made an absolutely horrible material choice for this piece. Seeing this, I was not surprise it failed. I was surprised at the Home Depot decided to carry such a tool. To rectify this mistake, I went instead to Lowes. Here I found a ratcheting one-handed crimping tool that was far superior to the piece from Home Depot. With this, the job became much, much easier. I wish I had started this tool and saved some time.
At this point, it was just cut, crimp, repeat. Corner bends are achieved by simply arcing the pipe, not with 90 degree joints as in copper. There is no danger of catching the house on fire at each point when working near a floor joist. It just goes together very easily.
It was late into day one, the hardware store was closed, I had restored hot water to the house, and I was feeling pretty good about my accomplishments for the day. So I decided to call it a night, just in case anything went wrong that would necessitate a trip to the hardware store.
Tip #5: Take your time soldering joints. The morning of day two I woke up eager to finish off this little project. The night before, I had completed all the runs of pex pipe for the cold water. All that was left to do is simply solder in a copper T into the cold line from the house and connect the pex. I cut out the section of copper pipe , let the water drain, and using my new found skills made quick work of soldering the T into the cold water line. I confidently walked over to the main shutoff valve for the house, turned the water supply back on but to my surprise I heard water running when everything should have been shut off. Checking my work I found that one of my joints was leaking. Apparently I got in too big of a hurry soldering the T into the copper lines of the house. So I shut the water supply back off, drained as much water as I could and attempted repair the bad joint.
Tip #6: Check your work before turning the water supply back on. Even a little water in the pipe will make it impossible to solder a joint. After several frustrating attempts to try to heat the joint enough to let solder flow, it became apparent that the water was acting as too much of a heatsink, pulling heat away from a joint. The solder would melt and fall to the ground instead of flowing in to seal the joint. Finally I gave up on all hopes of a repair.
Tip #7: Only work on plumbing when the hardware stores are open. Back in the truck I went for another trip to the store. Had i tried this the night before, it would have been a long night with no water. I was happy to know that there was a hardware store open when I needed more parts. I picked up another T, another pex connection as well as a short length of copper pipe to fill on for the span that would have to be cut out. I cut out the T with a bad joint and soldered in the new T, this time taking my time to carefully complete the joint. I checked the joint to ensure solder had covered the entire circumference of the pipes and this time when I turned on the main water supply I heard nothing. Music to my ears.
So in one short weekend I learned both the Do’s and the Don’ts of soldering copper pipe and that I really do prefer pex pipe for any new plumbing needs. I have a little bit more rough in work to do for the basement bathroom, but that will have to wait until the framing work is done. It is all pex from here, so it should not be nearly as eventful as the start of the project. And the new basement wash sink should be very convenient as this project progresses. If nothing else, it gives us a new place to give Eddie his baths when he comes home covered in something nasty. It was a little bit more labor than I expected for Labor Day, but all in all not too bad.